目次
ChatGPT
ChatGPTでいろいろ遊んでいます。なかなかに面白い嘘をつくのと、あんまり専門的でないので、僕の専門の用途では、なかなかうまく回答を引き出せないのですが(笑)
使いようによっては、かなり楽な部分がいろいろでてきたので。。ひとつ紹介。
オープンソースのライブラリなどを使い始めるときとかコーディングをするのに、とっても便利なんじゃないかな?と。。時々とんでもないの返してくるけど、そこそこ使われているようなものは、かなりちゃんとしたのが返ってきます。
今回は、OpenEMSが吐き出すXMLファイルを、FreeCADで描画するための部分部分で作っていく例を少し書いてみます。
ちなみに、ChatGPT 4使っています。3.5でもええような気もしますが。。OpenAIは、1か月毎で、入ったり出たりできるので、使うときだけ契約するのでもいいのかも?
FreeCADのPython=マクロ
FreeCADでPythonを動かすのに、Pythonコンソールを使うのもいいのですが、マクロを作成して、そこで実行すると簡単です。メニュー>マクロ から マクロの実行画面で、作成を押すと、Pythonスクリプトが書けます。 ここからいろいろ図形かいたりできます。

ChatGPTで聞いてみる
最初に、お決まりのあなたは、FreeCAD とPythonのエキスパートです!って言っておきます。

そうすると、なんでも聞いてくれ!ってかえってきます。 上は、新規の図面を作って、そこにBOXを書いてくれるスクリプトですね。 これもちゃんと動きます。
やりたいことを書いていく(GUI)
FreeCAD ってGUIにはQtを使っているようで、GUIを書くときに、Qtの関数名(API)を覚えておいて書かないといけないのですが、たまにしか使わないので、そんなの覚えてません。が。。
Filenameを選択するGUIをFreeCADのPythonで書いてくれって書くと。。

PySideを使って書いてくれます。
この関数は、現在のディレクトリから始まり、XML ファイルのみを表示するファイル ダイアログを開きます。 ファイルを選択すると、そのファイルへのパスが出力されます。 上記のスクリプトを実行するには、FreeCAD の GUI が必要であるため、FreeCAD の Python コンソールまたはスクリプト エディタで実行する必要があることに注意してください。 FreeCAD の外部のスタンドアロン Python インタープリターで実行しても機能しません。
ってちゃんとFreeCADのPythonコンソールか スクリプトエディタか使えと。。
これを先ほどのマクロにコピペして実行すると、ちゃんと動きます。

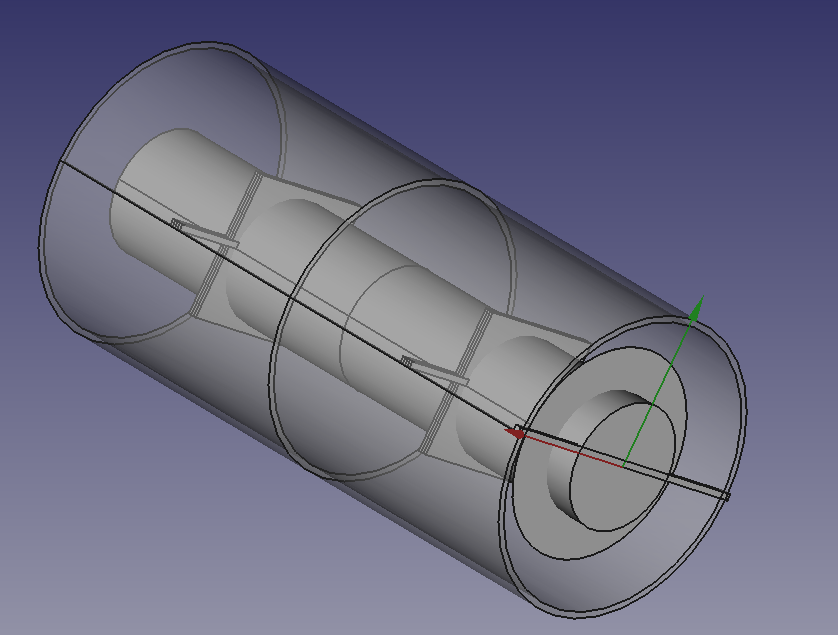
FreeCADの機能を駆使して描いてくれる。。
読み込みたいXMLをべた貼りして、これを書きたいんだよ。って無茶ぶりしてみると。。
それXMLみたいだね。 Cylinderはあるけど、Cylindrical shellってないから、引き算で作るとできるよ。と。。
こんなの書いてくれます。

で、これを実行すると。。 全部FreeCADで書き出してくれました。

ちなみに、これは、OpenEMSのmatlab での同軸のモデルです。
https://github.com/thliebig/openEMS/blob/master/matlab/examples/waveguide/Coax.m
これが吐き出す xmlファイルを見せてくれているはずです。。が。。実はちょっと違いますw
Octave & OpenEMSでCoax.mの、この部分
CSXGeomPlot([Sim_Path '/' Sim_CSX]);
を動かすと、一応、CSXCADで確認できます。

また、Paraviewで見たい場合は、VTKで打ち出すオプションをつけると。。すべての
openEMS_opts = '--debug-material --debug-PEC --debug-operator --debug-boxes';
RunOpenEMS(Sim_Path, Sim_CSX, openEMS_opts);
こんな風に確認できます。

違いますよね。。
Cylindrical shellの半径方向が違っていたり。。なのかな?
その違いを言ってあげると、ChatGPTは、返答してくれて。。書き出してくれます。
FreeCADのPythonスニペットとして使えそうですね!
ChatGPTが、今回使えそうなスニペット書いてくれたので一応、ここに保存(笑)
#
# Defs for create object by Coordinate Values
#


import FreeCAD, Part

doc = FreeCAD.newDocument() # Creates a new document

def create_cylinder(x1, y1, z1, x2, y2, z2, radius):
cylinder = doc.addObject("Part::Cylinder", "Cylinder")
cylinder.Radius = radius
cylinder.Height = z2 - z1 # Assuming z2 is the top of the cylinder
cylinder.Placement = FreeCAD.Placement(FreeCAD.Vector(x1, y1, z1), FreeCAD.Rotation(FreeCAD.Vector(0, 0, 1), 0))
return cylinder


def create_shell(x1, y1, z1, x2, y2, z2, radius, shell_width):
outer_cylinder = create_cylinder(x1, y1, z1, x2, y2, z2, radius + shell_width)
inner_cylinder = create_cylinder(x1, y1, z1, x2, y2, z2, radius)
shell = doc.addObject("Part::Cut", "Shell")
shell.Base = outer_cylinder
shell.Tool = inner_cylinder
return shell

def create_box(x1, y1, z1, x2, y2, z2):
box = doc.addObject("Part::Box", "Box")
box.Length = abs(x2 - x1)
box.Width = abs(y2 - y1)
box.Height = abs(z2 - z1)
box.Placement = FreeCAD.Placement(FreeCAD.Vector(min(x1, x2), min(y1, y2), min(z1, z2)), FreeCAD.Rotation(FreeCAD.Vector(0, 0, 1), 0))
return box

#
# XML parse and
#

import xml.etree.ElementTree as ET

# Parse the XML file
tree = ET.parse('your_file.xml')
root = tree.getroot()

# Iterate over the XML elements
for element in root.findall('.//Primitives'):
for primitive in element:
if primitive.tag == 'Cylinder':
radius = float(primitive.get('Radius'))
p1 = primitive.find('P1')
p2 = primitive.find('P2')
x1, y1, z1 = float(p1.get('X')), float(p1.get('Y')), float(p1.get('Z'))
x2, y2, z2 = float(p2.get('X')), float(p2.get('Y')), float(p2.get('Z'))
create_cylinder(x1, y1, z1, x2, y2, z2, radius)

elif primitive.tag == 'CylindricalShell':
radius = float(primitive.get('Radius'))
shell_width = float(primitive.get('ShellWidth'))
p1 = primitive.find('P1')
p2 = primitive.find('P2')
x1, y1, z1 = float(p1.get('X')), float(p1.get('Y')), float(p1.get('Z'))
x2, y2, z2 = float(p2.get('X')), float(p2.get('Y')), float(p2.get('Z'))
create_shell(x1, y1, z1, x2, y2, z2, radius, shell_width)


for element in root.findall('.//Primitives'):
for primitive in element:
# ... (existing code for Cylinder and CylindricalShell) ...

elif primitive.tag == 'Box':
p1 = primitive.find('P1')
p2 = primitive.find('P2')
x1, y1, z1 = float(p1.get('X')), float(p1.get('Y')), float(p1.get('Z'))
x2, y2, z2 = float(p2.get('X')), float(p2.get('Y')), float(p2.get('Z'))
create_box(x1, y1, z1, x2, y2, z2)

for element in root.findall('.//Excitation'):
# For now, just print the Excitation details
print("Excitation:")
print("Name: " + element.get('Name'))
print("Type: " + element.get('Type'))
print("Excite: " + element.get('Excite'))
print()

for element in root.findall('.//DumpBox'):
# For now, just print the DumpBox details
print("DumpBox:")
print("Name: " + element.get('Name'))
print("DumpMode: " + element.get('DumpMode'))
print()


#
# File Selection with GUI
#

from PySide import QtGui

def select_file():
filename, _ = QtGui.QFileDialog.getOpenFileName(None, "Open XML File", "", "XML Files (*.xml)")
return filename

filename = select_file()

if filename:
print(f"Selected file: {filename}")
else:
print("No file selected")
便利かも。。デバッグしながら、一緒に書いていくと、ちゃんと書けるようになる。。
関係ないけど。。FDTDシミュレーションの結果
ちなみに。。OpenEMSで、矩形グリッドで切るのと、Cylindricalグリッドで切って、計算させると、やはり若干の違いがでてきますね。。
OpenEMS 同軸 矩形グリッド pic.twitter.com/oivSI1iiIO
— Tetsuya Tominaga (@tom2rd) May 21, 2023
コメントを残していただけるとありがたいです